
Spring is coming! At least I think it is. It is still mighty chilly here in St. Louis. We have had a few teases of warm weather, but not as many as usual. The leaves on the trees are still no-shows, though the daffodils and crocuses are blooming. Grilling season is coming, which means I will start making hamburgers buns again. I didn’t actually stop over the winter, but we filled them with deli meat or tuna, which I guess makes them sandwich buns instead of hamburger buns.
Homemade buns leave mass-produced buns in the dust – this recipe makes slightly sweet, soft, yeasty buns with none of the too squishy texture store buns sometimes have. Never baked with yeast you say? You can do it. Repeat after me, “Yeast is not scary.” Say it again. Then pick up a strip of yeast packets at the store (and flour if you never bake) and start mixing. You can do it. And you won’t be sorry.
I have to admit, I baked bread for years before I ever thought to make my own hamburger buns. I made bread, cinnamon rolls, bagels, dinner rolls and pizza crust, but never hamburger buns. Now I almost always make our buns. They are that good. And not just for hamburgers, either. Homemade buns raise a humble turkey and cheese or tuna sandwich from ordinary to knock your socks off delicious.
The original recipe is from a fellow member of King Arthur Flour’s online baking forum, The Baking Circle. If you have time, check out the forum. It is a great place to get baking tips, ask questions and share recipes.The original poster’s screen name was Moomie and she came up with the recipe for her bread machine. I further adapted it for hand mixing or a stand mixer. And then I kept changing it. Thanks, Moomie, for the recipe and for free rein to tinker with it.
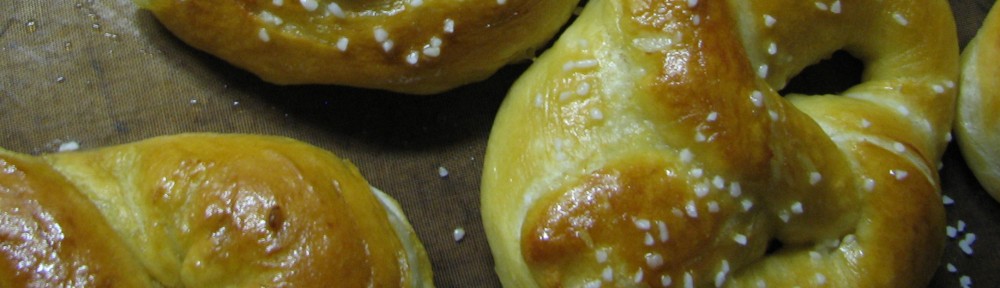
I have figured out a few tricks after mixing up many, many buns. First of all, make the buns really, really flat when you are shaping them. Otherwise you will end up with small, tall buns, which make sandwiches that require you to unhinge your jaw to bite. They rise after shaping, and they will rise a bit in the oven too, so make them flat. Did I mention flattening the buns?
It also doesn’t matter if the buns touch after rising. You want the sides soft. And commercial buns are usually connected at the sides anyway.
You can make the buns with white flour or whole wheat flour (or any other whole grain flour, for that matter). I make just about everything whole wheat, and the buns are no exception. The original recipe called for only all-purpose flour, but I have tinkered with the technique to make them whole wheat without sacrificing taste or texture.
The first whole grain secret is to use white whole wheat flour. Check my post on whole grain flour to get the full scoop. The second secret is to use milk instead of water. Milk makes a softer bun, no matter if you are making them whole grain or not. Finally, give the whole wheat flour time to absorb the moisture in the dough. This is as simple as mixing up the dough using part of the flour, and letting it sit, covered, for fifteen minutes. After the rest period the whole wheat flour will have absorbed some of the liquid, making it less likely that you will add too much flour during mixing or kneading. Especially with whole grain baking you need to be careful with the flour or you will end up with heavy, dry baked goods.
Because the dough is so soft, it will probably stick to your hands a bit as you start to knead. If you have a bench knife, dough scraper or even a regular rubber spatula, you can use it in one hand to help work the dough until it is slightly less sticky. If you have a stand mixer, use it to mix and knead the dough – it doesn’t care if dough sticks to it.
Now, repeat it again, “Yeast isn’t scary.” You can make your own buns, and they will be fabulous. Do your hamburgers and deli turkey a favor and try out some buns sometime soon. You won’t be sorry.
Download or print just the recipe.
Hamburger Buns
Adapted from Moomie’s Buns by The Cook’s Life
Makes 10 large buns
I usually use 2 cups of white whole wheat flour, though I sometimes use up to 3 cups. Be sure to give them the rest if you are using the whole wheat. This allows the flour time to absorb some of the moisture in the dough. It also helps you to avoid adding too much flour during kneading, which will make the buns heavy and dry.
If you have a stand mixer (like a KitchenAid) use it to make these. You can use less flour if you knead the dough in the mixer since stickiness doesn’t matter as much. If you do use the mixer, let the dough rise right in the bowl, covered. If the dough is still sticky after rising, you can knead it briefly by hand before shaping the buns.
3 to 3½ cups all-purpose flour (use 1-2 cups white whole wheat flour, if desired)
¼ cup sugar
1 teaspoon salt
1 package yeast (2¼ teaspoons)
2 tablespoons canola or vegetable oil
1 egg
1 cup warm milk
Mix 2 cups flour (add all the white whole wheat flour now, if using), sugar, salt, yeast, oil and egg in a large bowl. Add warm milk and mix vigorously. If using whole wheat flour, let dough rest about 15 minutes, covered.
Add remaining flour until a very soft dough forms. Knead about 5 minutes, adding flour as needed (see headnote). Try to be sparing with the flour, but not so much that the dough sticks to everything. Add flour only until the dough doesn’t stick to your hands or kneading surface.
Let rise in a greased bowl, covered with plastic wrap, in a warm place for 1 hour. Lightly grease a large baking sheet, or line with parchment paper. Set aside.
If the dough is very sticky, knead it for a minute or two, adding about a tablespoon of flour. Divide dough into 10 pieces. Form each piece into a smooth ball. Place each ball on the baking sheet and FLATTEN with your floured hand. You really want them flat so that they are shaped like buns after they rise.
Cover loosely with waxed or parchment paper and let rise 30 minutes.
After 15 minutes of rising, preheat oven to 375 degrees. After 30 minutes of rising, bake 12-15 minutes, or until nicely browned on top and bottom.
Cool buns on a rack until room temperature before slicing and serving. Freeze if not using within a couple of days. They dry out rapidly, which is especially noticeable with hamburgers. Slice before freezing.

Those buns looks so soft! I must admit, I am unfortunately one of those that are freaked out by using yeast.
They are soft! Do you bake with yeast at all? Try my no knead pizza dough:
or one-hour rolls:
to get you started. It is mostly a matter of trying. You might not get the prettiest results, but they will be tasty! Please let me know if you have any questions!
I tried baking with yeast once upon a time ago. I think it’s time to take the plunge with one of your recipes!
Please try one! You won’t be sorry. Let me know how it turns out when you do!
Will definitely let you know when I do! 🙂
I have baked KAF’s recipe for ‘Beautiful Burger Buns’ in the past with pretty good results. I’d be interested to give buns another try, since I now have a scale and weigh my flour – this seems to make such an enormous difference in my baking results, especially with bread! Thanks for the recipe. I have heard of
‘Moomie’s Buns’ but never seen the details spelled out…
Very much enjoying your blog; reading old posts (new to me!) and finding lots of value and entertainment. Thanks again.
Thanks, Carole. Glad you are enjoying the blog! Moomie’s original recipe had only white flour, and only 3 cups, and used butter instead of oil. Her dough was considerably wetter than mine, but I found it really hard to work with.
Since you are using a scale – I do a sprinkle and sweep cup of flour, so my cups are about 4.25 ounces for AP flour and slightly more, 4.3 ounces for white whole wheat. Let me know how you like the buns when you try them!
I will! I have a couple of baking projects lined up before buns, but my husband is always so happy to have them, I guess maybe they should be moved up in the queue. Thanks for the recipe, tips, and inspiration!
Sarah,
Do these keep well in the freezer? I’ve been thinking that it would be a good idea to use the cow of ground beef in the freezer as burgers, and I’m just not happy with the buns I can get at the store. I would like to try this.
Thanks!
Yes, they absolutely keep well in the freezer. I like to make them ahead and have a frozen stash ready. If you slice them almost all the way through before you freeze them they thaw faster, and tops and bottoms stay together. I store mine in a freezer ziplock. Let me know how you like them when you try them!
Sarah, are these Moomies Buns? And if they are you need to give credit for them. The cardinal rule of baking is always credit the maker of the recipe. And I have a better English Muffin recipe than the one on KAF. Yours Judy
Judy, thanks for the catch. I had credited Moomie in the story with the text, but I forgot to do it in the recipe. It’s fixed now.
I saw KAF’s English muffin recipe today. My favorite is one I adapted from their 200th Anniversary Cookbook – sourdough but no yeast, unlike the most recent one they posted, that has both. What is yours leavened with?
Sarah, do you by any chance have weights for all the ingredients in your whole wheat dough? Your switch to milk was inspired!
Thanks!
Forgot to mention that grams would be great, but so would ounces.
Thank you! I don’t have the weights offhand, but I’ll get them posted in a day or two. In grams and ounces for your baking pleasure. 🙂
Sarah, that’s wonderful news! So much more than I expected. I know that there are a lot of “weighers” out there who will be as grateful as I am.
Okay, Rita, here are the weights for the whole wheat version of the bun recipe, in both ounces and grams. If you want less whole wheat and more white flour, adjust accordingly.
My cup of white whole wheat weighs 127 g. or 4.25 oz. My cup of all-purpose flour weighs 122 g. or 4.25 oz.
White whole wheat flour: 255 g. or 9 oz.
All-purpose flour: 122-183 g. or 4.25-6 oz., adjust when kneading
Sugar: 56 g. or 2 oz.
Salt: 6 g. or 0.25 oz.
Yeast: 8 g. or 0.3 oz.
Oil: 29 g. or 1 oz.
Milk: 227 g. or 8 oz.
I wasn’t sure if you wanted just dry ingredients, or everything, so I gave you everything but the eggs. Hope this helps!
Sarah, how generous of you to share all the weight information. I’m itching to make the buns but will have to wait until after Christmas. Pure punishment for me to have to wait! Will keep you informed.
Thank you so very much! Rita